This Chocolate Cake Filling is ultra-creamy, light, and made with just 5 simple ingredients! It whips up in under 20 minutes and chills into the perfect thick, spreadable layer for cakes, cupcakes, or any dessert that needs a light and airy chocolate cream topping.

Jump to:
Why you’ll love this recipe!
This fluffy, no-bake chocolate filling is a total game-changer for cakes, cupcakes, or any dessert in need of something luscious and chocolatey. It’s incredibly simple to make and yields a filling that has the vibes of: whipped cream, chocolate mousse and chocolate pudding all at once!
I love using it to sandwich between chocolate cake layers (chocolate on chocolate is unbeatable). It’s also amazing piped into cupcakes or added to a tart shell for a quick chocolate cream pie! However you use it, this filling brings major chocolate mousse vibes with barely any effort and no raw eggs.

I love this recipe and I think you will too because:
- No oven needed! This is a completely no-bake filling—just melt, whip, chill and whip!
- Easy to prep ahead. Stores beautifully in the fridge and stays thick and spreadable.
- Perfect for celebrations. A crowd-pleaser for birthdays, holidays, or whenever you’re craving a rich chocolate dessert.
Ingredients for the filling

The ingredients you will need to make this strawberry cheesecake filling consist of:
- Semi-sweet chocolate – Melted into warm cream for a smooth, rich chocolate base.
- Heavy whipping cream – Whipped to medium-stiff peaks, it lightens the filling and gives it a mousse-like texture.
- Unsalted butter – Adds richness and helps create a silky, glossy ganache.
- Confectioners’ sugar – For balanced sweetness with no grainy texture.
- Vanilla extract – Enhances the chocolate flavor and rounds out the overall taste.
Ingredient swaps & substitutions
I wouldn't change much of this recipe, but here are some helpful tips -
- Not just for cake! Spoon this chocolate filling into tart shells, use it as a dip for fruit, graham crackers, or cookies.
- Turn it into a chocolate mousse dessert. Pipe the filling into ramekins or small jars, top with whipped cream and chocolate shavings for an easy, elegant no-bake treat.
- Dairy-free option. Swap in your favorite plant-based chocolate, dairy-free cream, and vegan butter to create a creamy, vegan-friendly version.
Instructions
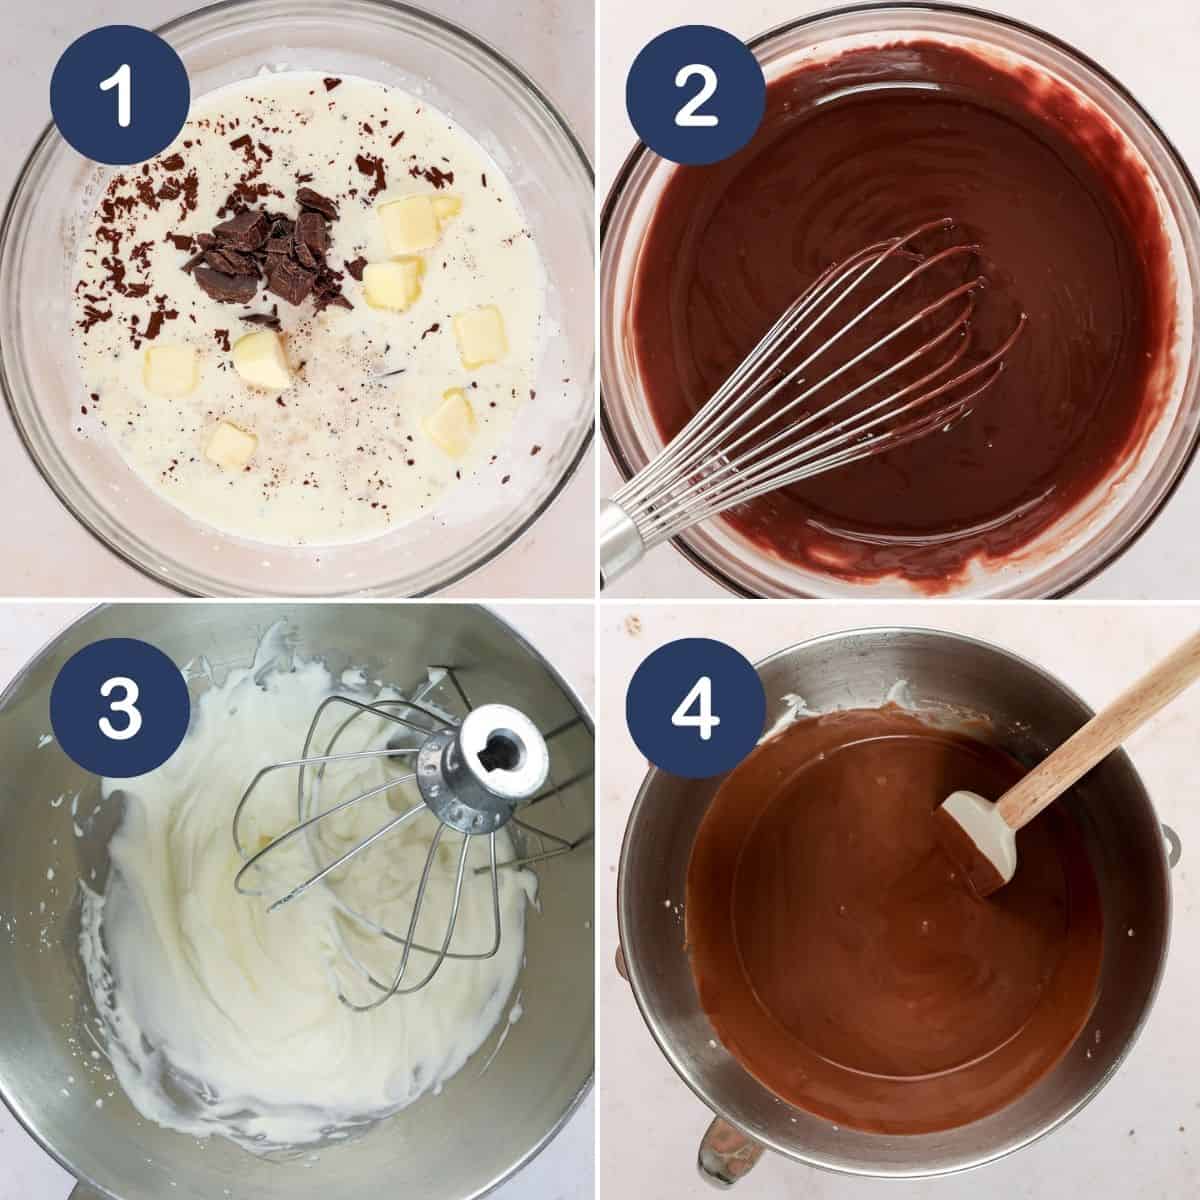
Step 1: Heat 1 cup of heavy cream in the microwave for 1½–2 minutes until just simmering.
Step 2: Add chopped chocolate, vanilla, and butter to the hot cream, let sit 4 minutes, then stir until smooth. Chill the ganache in the fridge for 15 minutes.
Step 3: In a clean bowl, whip remaining 1 cup heavy cream with confectioners’ sugar to medium-stiff peaks.
Step 4: Gently fold the cooled ganache into the whipped cream in two additions.

Step 6: Cover and refrigerate for 2 hours until thick enough to use.
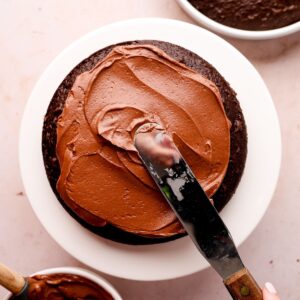
Step 7: Rewhip the filling with a whisk or whisk attachment for 1 minute until thicker and more stable before spreading or piping.
Storage
Fridge: Store the chocolate filling in a covered bowl in the fridge for up to 4–5 days. If using in a pie crust, keep refrigerated and serve within 2 days to avoid a soggy crust.
Freezer: Avoid freezing the filling alone. However, a fully assembled cake or filled pie can be frozen for 2–3 months—wrap tightly in plastic wrap and place in a freezer-safe bag. Thaw in the fridge overnight before serving.
Recipe FAQ’s
Yes, but the filling will be sweeter and slightly softer in texture. Adjust the sugar if needed.
Yes, but make sure to give it a quick re-whip right before layering otherwise it can be a bit too soft. I would use this filling for a single layered cake, but not a tiered cake with more than 2 layers.
If the filling is still not stable enough once you rewhip & spread it onto the cake layer, freeze it for 10-15 minutes and then re-spread as it is thickened. This works like a charm!
It’s best kept chilled until serving, especially in warmer weather.

Related recipes you may love

Have you tried this recipe? Consider leaving a ⭐️⭐️⭐️⭐️⭐️ rating in the recipe card right below and/or a review in the comment section further down the page. Or, consider following me on Facebook or Instagram! Thanks for visiting.
Chocolate Filling for Cake
Ingredients
Tools
⭐️ Before you begin! If you make this, will you do me a huge favor afterwards and leave a review and rating letting me know how you liked this recipe? This helps my small business thrive so I can continue providing free recipes and high-quality content for you.
Instructions
- Pour 1 cup of the heavy whipping cream into a large microwave safe bowl. Microwave for 1 ½ to 2 minutes until just about to boil (be careful not to let the cream overflow out of the bowl).
- Add the chocolate, vanilla and butter into the bowl and press down with your spoon so it’s covered in the hot cream. Let sit for 4 minutes. Mix everything together with a rubber spatula or spoon until a thick glossy cohesive mixture forms.
- Set in the fridge for 15 minutes to cool off.
- Place the remaining 1 cup of heavy whipping cream & confectioners sugar into a large bowl or stand mixer bowl with a whisk attachment.
- Whisk 2-3 minutes until medium-stiff peaks form. The whipped cream should hold its shape when the beater is lifted but not be too stiff.
- Use a rubber spatula to fold the chocolate ganache mixture into the whipped cream in two additions, just until no streaks remain.
- Cover the bowl directly with plastic wrap and set into the fridge for 2 hours to firm up before using in your cake layers.
- Whip the filling on medium speed for 1-2 minutes until thickened before spreading between cake layers or piping onto cupcakes.
Test Kitchen Notes
- If the filling seems loose once spread onto the cake layer, place the layered cake in the freezer for 10-15 minutes and the filling with set even more without actually freezing.
- This recipe makes enough to fill and ice a 2-layer 8" cake, pipe onto 12–15 cupcakes, or fill one standard 9" pie crust.
- For a pie: Spread the filling into a fully baked crust and chill for at least 4-6 hours before slicing. Freeze for 1 hour before serving for smooth slicing!
- Store covered in the fridge for up to 5 days.
- While the filling itself shouldn't be frozen, a filled and assembled cake or pie can be frozen for 2–3 months.
- To make it dairy-free or vegan, use a plant-based whipping cream and dairy-free chocolate and butter.
- Once chilled, this filling is firm enough to pipe or spread, but still light and mousse-like in texture.
Frieda Greenblatt says
Delicious!! Thank you for sharing your recipe!