Decorate this easy Sesame Street themed Cookie Monster Cake in only 30 minutes, layered with chocolate cake, whipped cream, cookies and buttercream frosting!

Jump to:
Cookie Monster Cake
This cake consists of layers of delicious chocolate cake with chocolate ganache, blue frosting and pre-made chocolate chip cookies! You can even make my homemade Sesame Chocolate Chip Cookies to use in this cake.
This cake Can be made gluten free! I love to use my gluten free chocolate cake recipe for the layers of the cake.
Ingredients
- 2 chocolate cake layers - I love to make a moist homemade chocolate cake as the perfect layers in this cake. Not only is it a cute cake, it tastes delicious!
- Whipped cream - Whipped cream between each layers is the perfect light and fluffy filling for this cake!
- Chocolate Ganache - I like to use chocolate ganache to ice the outside of the cake so it has a smooth exterior to pipe the buttercream onto.
- Buttercream Icing - This bright blue buttercream icing scream cookie monster! It's vibrant and delicious!
- Gel Food Coloring - Gel food coloring will give your buttercream icing the bright blue color that we want our Cookie Monster fur to have.
- Chips Ahoy Cookies or Gluten Free Chocolate Chip Cookies - I like to use these cookies in between the layers of cake on top of the whipped cream, and of course decorate the top of the cake with them.
- 2 Oreos - Oreos are used for the eyes of our Cookie Monster cake!
- White chocolate - Each Oreo is dipped into melted white chocolate to form cookie's monster's eye.
- Dark chocolate - A dot of dark chocolate is piped onto each Oreo "eye".
Ingredient swaps and substitutions
- Use a different cake - I love to use chocolate cake for this recipe, but you can. easily use a vanilla cake recipe, or even red velvet or carrot. Truly any cake will work!
- Swap the whipped cream filling for a whipped ganache, buttercream or my Cheesecake Filling for Cake (No Bake) - This is a really easy recipe swap that you can do so that this cake has your favorite filling.
- Use a Swiss meringue icing instead of American buttercream - If American buttercream is too sweet for your liking, opt for a less sweet buttercream such as Swiss Meringue buttercream!
- Make it vegan! Use a vegan cake recipe, vegan whipped cream substitute, coconut milk in the ganache, and use vegan buttery sticks in the buttercream recipe.
How to Make This Cookie Monster Cake
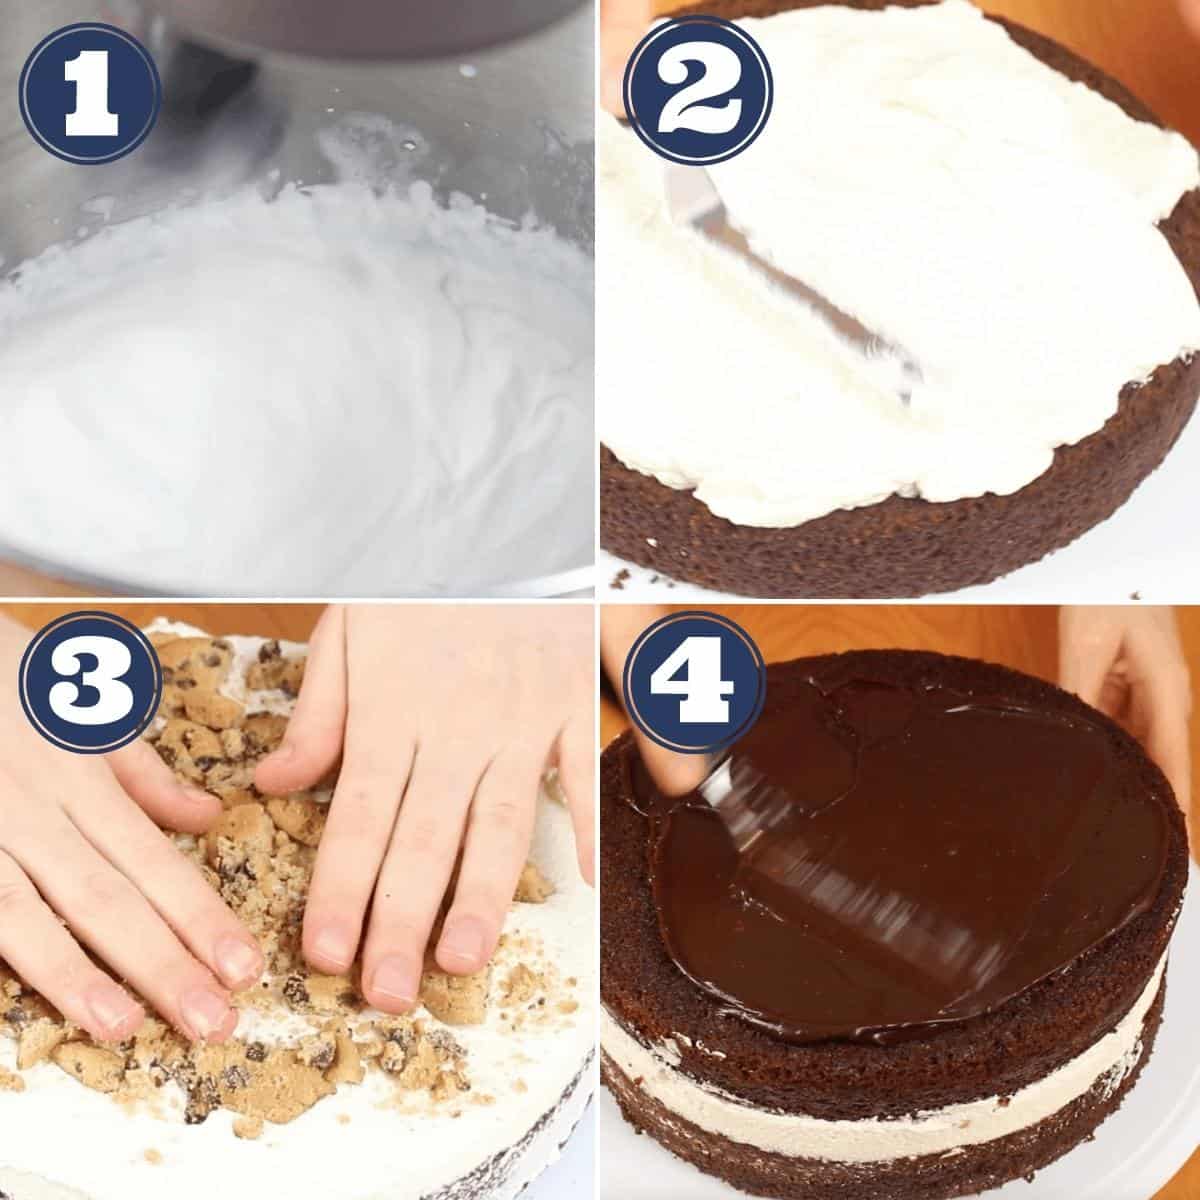
Step 1: Whip the whipped cream in a bowl of stand mixer until stiff peaks form. Be sure not to over whip otherwise it can turn into butter!
Step 2: Spread the whipped cream over the first cake layer.
Step 3: Top the whipped cream with crushed cookies, and make sure it's covering the entire layer, leaving about 1" without cookie crumbs around the perimeter so they don't fall out of the cake.
Step 4: Add the second layer of cake on top, making sure to place it upside down so the smooth side is facing upwards. Begin spreading the chocolate ganache on the top of the cake and along the sides. Refrigerate the ganache iced cake until it is set and no longer tacky.
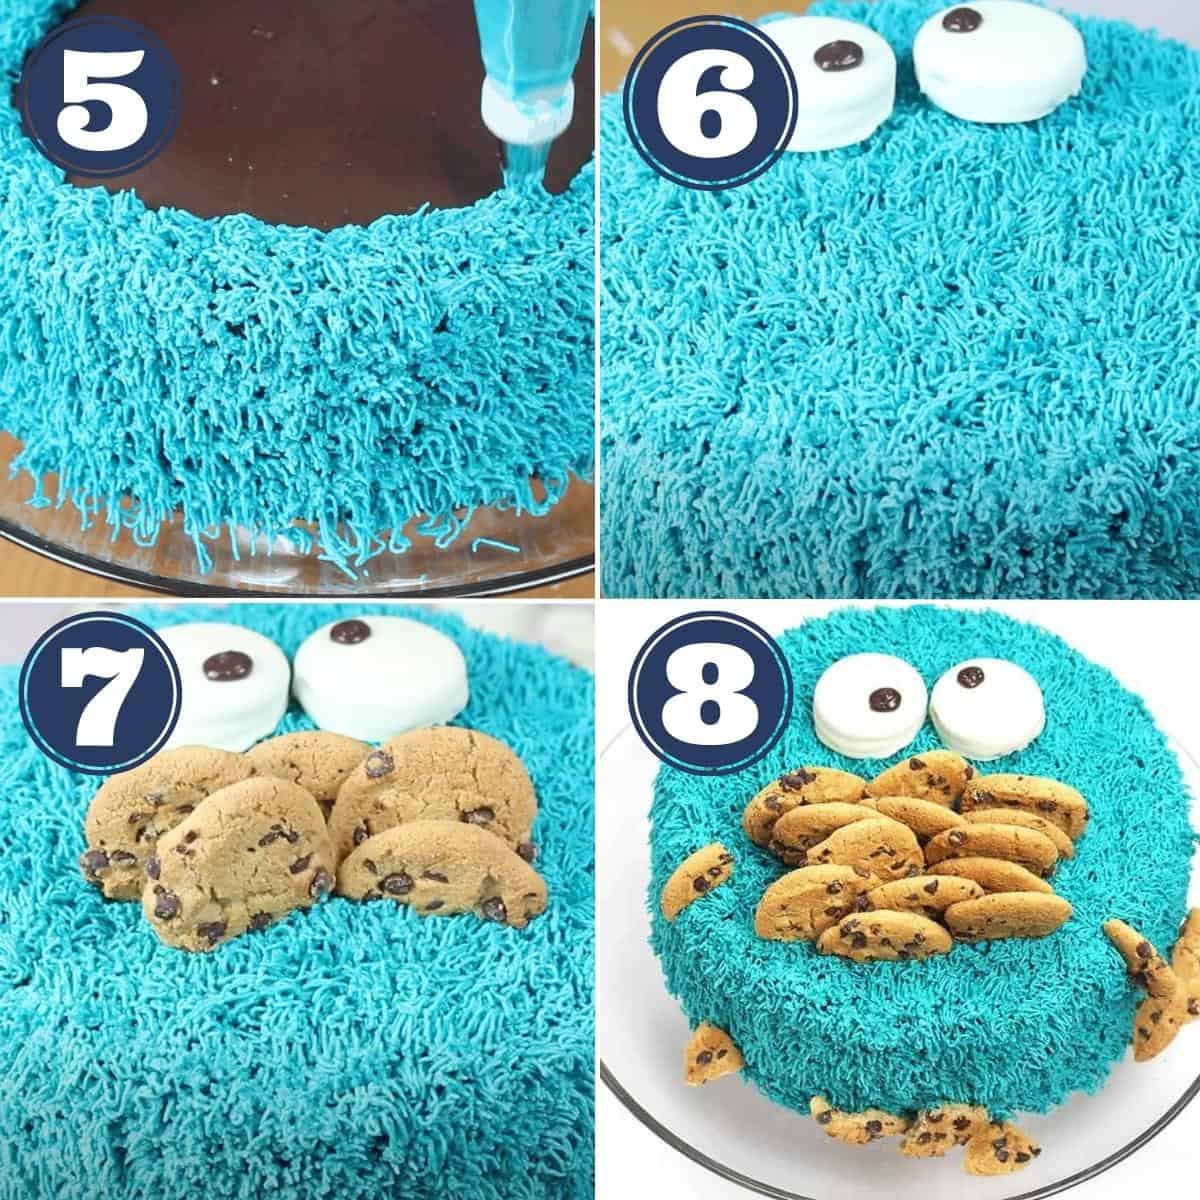
Step 5: Use a grass piping tip (Wilton #233) to pipe the icing all around the top and sides of the cake.
Step 6: Once the cake is iced, decorate with cookies + a white chocolate dipped oreo with two chocolate dots as the eyeballs.
Step 7 and 8: Add the cookies to the mouth area of Cookie Monster on the cake. Also decorate some of the sides with cookie too!
Recipe FAQ's
For sure! Feel free to prep the entire cake 1-2 days in advance and store in a cake holder in the fridge. When you're ready to serve, defrost on the counter for about 45 minutes.
Top Tips
- Prepare all the components in advance, so you can easily assemble the cake the day you plan to serve it.
- Use store bought icing to save time if this cake feels a bit too complicated; nobody is judging!
- Make this cake gluten free by using a gluten free cake recipe, gluten free cookies and gluten free Oreos.

Related recipes you may love


Have you tried this recipe? Consider leaving a ⭐️⭐️⭐️⭐️⭐️ rating in the recipe card right below and/or a review in the comment section further down the page. Or, consider following me on Facebook or Instagram! Thanks for visiting.

Cookie Monster Cake
Ingredients
Tools
⭐️ Before you begin! If you make this, will you do me a huge favor afterwards and leave a review and rating letting me know how you liked this recipe? This helps my small business thrive so I can continue providing free recipes and high-quality content for you.
Instructions
- To make the whipped cream, place heavy cream, confectioners sugar and vanilla in a bowl of a stand mixer fitted with a whisk attachment or in a bowl with a handheld electric mixer.
- Beat on medium speed until thick and fluffy, like whipped cream. Set in the fridge meanwhile.
- To prepare the ganache, begin with boiling the heavy cream in a small saucepan. Then, pour over a bowl of chocolate chips. Allow to sit for 3 minutes, then stir together until a thick chocolate mixture forms. Cover the bowl with plastic wrap, pressing directly onto the ganache, and allow it to sit in a cool place on the counter overnight.
- For the Chocolate Covered Oreo “Eyes”, place white chocolate with vegetable shortening in a microwave safe bowl. Microwave for 20 second intervals, stirring in between, until fully melted. Dip each Oreo into the melted chocolate and allow excess chocolate to drip off before placing onto a parchment lined baking sheet to dry. Place ganache into a ziplock bag and snip off the corner and pipe a dot in the top right corner of each oreo to create the eyeball effect. Use a toothpick to smooth the ganache into a circle shape if needed.
- To assemble the Cookie Monster cake, level each cake using a serrated knife.
- Place a cake board onto a cake turn-table or your counter and spread a bit of whipped cream onto the center to help your cake stick. Place the first layer of cake, cut side down, onto the cake board.
- Spread the whipped cream onto the first cake layer and sprinkle with crushed cookies (be sure to save some whole cookies for the cake decorations).
- Place the second cake layer on top and press down. Run an offset spatula around the sides of the cake to smooth out any whipped cream that oozed out of the cake.
- Ice the entire cake in chocolate ganache. This layer does not have to be gorgeous because nobody will see it, but it should be smooth for piping onto.
- Fill a piping bag with the teal colored Buttercream, fitted with a coupler and tip #233 (Wilton grass tip) and pipe grass all around the sides and top of the cake.
- Place the chocolate covered Oreo eyes onto the top-center of the cake.
- Then, arrange the cookies around the mouth area of your cookie monster cake. I broke the bottoms off of many of the cookies so that they weren't too high. You can also place a few broken cookie pieces on the sides and bottom of the cake to make it seem like Cookie Monster overstuffed his face and food is falling out.
Test Kitchen Notes
- Prepare the cake layers in advance as well as the frosting/icing, so you can easily assemble the cake the day of serving.
- Feel free to use store-bought icing if it's easier!
- Make this cake gluten free by using a gluten free cake recipe, gluten free cookies and gluten free Oreos.
- Make ahead: You can assemble the cake up to 2 days ahead and store in your fridge until ready to serve. Take out of the fridge at least 2 hours before serving to allow the frosting to soften.
Amy says
This is too cute. One of my son's nicknames is "Cookie" after Cookie Monster. Any kid would love this cake. Pinned!
Dalya Rubin says
Thats such a cute nickname! Thanks so much for pinning my post!